In the tons of emails we get everyday, there are some common threads and questions that land on our desk, so we thought we’d start a segment on ye olde blog for a little of this’n’that. I always end up learning a lot in the answering myself and am trying to learn to be more eloquent and respectful to the experiences of all of us knitting together (i.e. please bear with me).
Here’s three excerpts with some recent themes…
DECREASING in a Lace Pattern…
From January 30th: “Hi Bonne Marie, I’ve decided it’s time to resurrect my Ariann from ’08. Oh yeah, I remember why it was deep-sixed… the decreases (top of page 4) confused me. Would you be able to lend a hand?
So, I’ve joined the Body & Sleeves (whoops, I typed “boy” & sleeves) and I’ve knit my first decreases row ( SSK, K1,SM, K1,K2Tog) successfully, so I get that, but… what should I do when I get to a place when the eyelet pattern already calls for a SSK or a K2Tog? Should I omit a YO instead, or SSSK and K3tog or a K?”
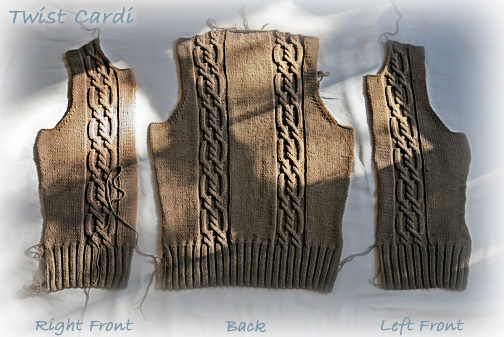
La Réponse: “Glad to hear you’ve recusitated a project! I’m doing that myself with a Twist sweater I started :)
Decreasing in Lace:
The secret is understanding that all of the lace is made up of paired decreases. That means it is 1-to-1 K2TOG to a YO or SSK to a YO. Each decrease has a corresponding yarnover, either before or after.
The Ariann stitch pattern is a 12 st repeat of two 6 st sections. If you look a the graph, you see there are two paired decreases, each which contains a YO. If you cannot do the YO, do not do the DEC.
Just work that 6-st section as Stockinette st or you will end up with a lot of extra stitches.
Look at your chart and visualize what is happening across the pattern repeat. Really look at that 1-to-1 pairing and see how it looks on the chart. Since you are having trouble, use more stitch markers to indicate the beginning or end of your lace repeats – especially towards the raglan area. That way, you can see at a glance how many stitches are left in each respective area.
VERY IMPORTANT: If you do not have enough stitches to do a whole paired decrease (look at your chart to check if needed) work those stitches as plain knit stitches on the RS and purl on the WS.”
REVERSE ALL SHAPING…
From February 8: “I just wanted to write to say that although I love the cardigan I am now working on- Twist, I am frustrated to have paid almost $6.00 for what I consider to be an incomplete pattern. Spacing for buttonholes is not given and I also don’t like how the right front pattern just tells me to copy the left front, but swap the increases, etc. I have worked more complete free patterns than this and I am disappointed enough to think twice before buying another Chic Knits pattern again.”
La Réponse: “We can appreciate your frustration, but in actuality, all the information you need is already in the pattern. :)
Did you know that most sweater patterns that are knit in pieces start off with the Back section for a great reason? (Perhaps you weren’t taught this when you made your first sweater.) But this is the main reason why a pattern does not include those directions more than once. No one is trying to frustrate the knitter; it just isn’t necessary to repeat the process.
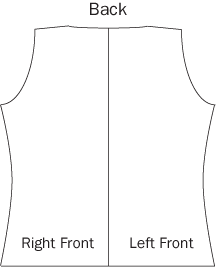
In the Back piece, all the directions for all shaping that occurs on both sides of the pattern, ie. side shaping, armholes, etc. will also apply to the Front pieces. Front shaping has to match when you put the sweater together, so the Back is a great reference when you make the other pieces.
It is to be used as the template for the Fronts as you knit them; each side of the Back corresponds to one side of the Front. With right-side facing outward, the right edge (first edge worked) instructions of the Back apply to the Left Front shapings; the left edge (last edge worked) instructions of the Back apply to the Right Front shapings.
You can read the directions directly from the Back for those particular sections without having to re-invent the wheel when you get to either Front.
Hope this helps a little…”
CAN’T OPEN MY PDF:
From February 8: “Hello – I purchased the bucket hat pattern yesterday and somehow downloaded and unreadable pattern. I am not computer savvy. Can you help me in any way?… I am so disappointed with my error because I can not proceed after finding this great pattern. Hope you can help me!!”
La Réponse: “Sounds like the wrong Program is opening the PDF file and you are getting gibberish; this is a file association thing on your computer. The file is not damaged. It should be opened using the Adobe Acrobat Reader Program instead of what is trying to control it.
If you are unsure of where or if you have Adobe Acrobat Reader (most computers come with this program already loaded), you can download it here.
Try this:
Do not double-click on your file. OPEN THE Adobe Acrobat Reader program FIRST. Then got to the Menu Bar>File>Open & choose your file from wherever it downloaded to and it should pop right open.
Save it (using the Save As choice) to a safe place on your hard drive where you can find it and print out a copy for safe keeping.”
++++++++++++++++++++++++++++++++++++++++++++++++++++++++
That’s it for now! Anybody who understands how to TAG posts using WordPress — could you drop me a line HERE – (infoATchicknitsDOTcom…) — I’m in need of some direction myself ;p
Don’t quite understand how to do this best…


