My favorite thing about Dear Watson is his POCKETS!
For some reason, my little brain is not coded to carry *extra* stuff off-person. Be it a purse, doggie bag (don’t even offer to wrap it), or glasses, if it isn’t in my pocket, it will surely be left behind. It’s a measure of my Passion/Obsession for Knitting that I can even carry a project around without it going up in smoke, but so far, none have gone AWOL…
So, it is in my ultimate Best Interest to put pockets on things that Might Be worn outside. Little Dear Watson, then, was a ripe candidate for the addition of same.
And like any variation on a theme, practice, practice, practice! is the order of the day. I like to think of it like playing the piano – most anyone can pick up Chopsticks the first time out, but a concerto, oh my! I must say, would you rather be Charley Brown or Linus! (whispering)
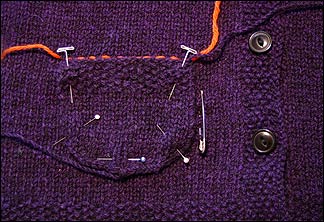
This hand-knit pocket took 5 versions before I liked it. THEN, it took a bit of pinning to go where I thought it would look best. Everybody is shaped differently across the hips, below the waist. In my family, we look broad from the front and thin from the side – not really very round – more rectangular. So my pockets will hit differently from someone who is shaped, perhaps, more cylindically.

Now comes the fun part! I run a colored *thread* (a piece of yarn brighter than what I knit with which in this case is almost any yarn on the planet) through the row of stitches right above where I want the top of the pocket to be placed.
Then, being a lazy bones, I use a giant safety pin to mark where the side should be, running it through the column of stitches a distance from the front band. I note the number of rows and the number of columns, because in this case, there is Pocket #2 to be attatched later.

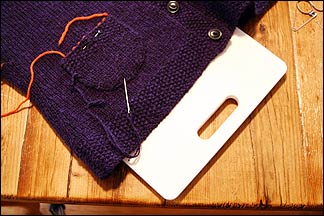
Secret Weapon #2: I use a plastic cutting board under the top piece (front) to seperate it from the back of the sweater. Then I can pin to my heart’s content on whatever needs pinning.
“Excellent!” I cried. “Elementary,” said he: to get to the finish line as quickly as possible, I sew this to the garment while I am STANDING UP! I can control the sewing much better from above, on a smooth plane. I put my non-needle hand on the piece being sewn, and slip-stitch the pocket to the sweater, using small stitches, stopping to tighten them (but not pucker) around the edge of the pocket, removing the pins when they get in my way. The Cutting Board allows a firm contact below the two pieces being joined, without distortion to the fabric or damage to my table.
and dear Watson was heard saying as he went his merry way: “I had neither kith nor kin in England, and was therefore as free as air


Thanks for the tips. The sweater is very nice – is that the Twist pattern sans cables? I LOVE my Twist – have been wearing it much even though I haven’t sewn buttons on yet. :-) Will send a picture soon, with buttons.
I’m like you. Pockets are essential! I’ll often take a jacket with me when I don’t really need one, just so that I can have pockets handy.
hi bonne – I am a somewhat experienced hand knitter but newish machine knitter and was wondering if you had any advice regarding how to produce nice sweater shaping on a knitting machine as opposed to hand knitting…. i’m about to get started on my first sweater on the machine and could sure use the advice!
Pockets = Purse!
The Dear Watson is a different gauge than the Twist Cardigan – also has different shaping, collar and detailing…
Can’t wait to see your sweater, Tamara!
I, too, have never mastered the Bond and it sits forlornly in my attic.
I get a few rows into a swatch and the dang thing hops off the hooks, and I can’t for the life of me figure out how to get it back on. Help?
Hi Heather! If you are an experienced hand knitter, you should have no problems translating your talent to the machine. Although actual stitch manipulation is slightly different (my machine came with a book that showed that), all increase and decreasing principles are exactly the same – whatever (and wherever) you’ve been doing – just keep doing it! :)
I’ve never actually used a machine knitting pattern to make a garment – I always use hand-knitting patterns.
Hey Rose! The Bond: almost everything I’ve learned has come from online sites especially this one — http://www.stephthornton.co.uk/knitting/kbond.htm
Mine also came with a video and a booklet – I set the machine up in front of my TV with the video playing and knit everything along with the instructor. I made every Small Project they included patterns for and at the end of those projects, I was ready to make a sweater.
Here’s a good page with problem solving tips:
http://www.bond-america.com/help/help_usm.html
It might also be fun for you to see if a local group or even your town has a class available so you could see it demonstrated in person…
Just remember – you didn’t ride your two-wheeler bicycle the first time you tried either. Some things take practice (and a little dustin’ off…) But I think the effort is worth the learning curve :)
Sorry Bonne, don’t mean to sound “daft”, but, what do you mean by a slip stitch? I know it from crocheting seams together, but I don’t understand how it’s used to sew the pocket.
Where can I look up the technique? I don’t make pockets often, and tend to sew them on using a back stitch between the rows (hmmm). The slip stitch sounds better, even.
Please help, as I’m always looking for a better way. This may encourage me to use pockets more, cause I lost my phone at the yarn sale; it was found in one of the bins.
A slip stitch is what I was taught to use when you hem a dress, etc.
http://www.fiber-images.com/Free_Things/Reference_Charts/handsewing_stitches.htm
rb – Have you tried putting weights on the cast-on row? Or even putting a waste yarn through it and tying it down (temporarily) to something heavy on the floor? Just a thought.