 The top-down set-in sleeve adventure continues!
Thank you to all who sent suggestions — I was having so many light bulb moments it was like standing next to Brangelina in a crowded room!
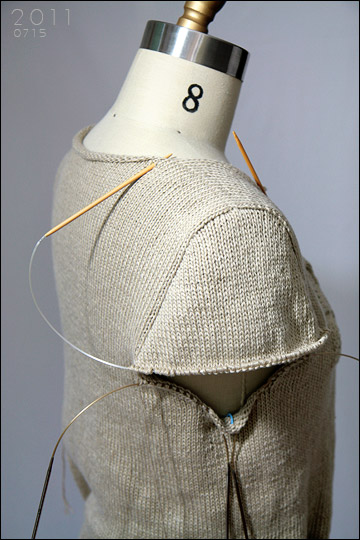
Here’s my sleeve cap/sleeve so far…
First Impressions: this method uses a sleeve shape construction that matches one that is seen frequently in commercial garments (take a look in your closet). It is taught widely – I took a class at Stitches Midwest a while back (2005 – presented by the wonderful Jean Frost! Catch it if you have a chance…)
With this method, you are making a simple trapezoid, with two static areas: the shoulder top width and the underarm bindoff area. There is a lot of theories about what these should measure, but the best thing to do is to look at real world garments in one’s wardrobe and Your Own Body.
Look at the shape of your arms and torso and shoulders. You can estimate what the dimensions of these areas need to be to “cover” those specific areas, which have indiviual characteristics. It’s good to understand that some parts are curvy while others are straight; one needs to remember that you will be asking your knitting to approximate those shapes and planes. If you are like me, you can be caught staring at people’s clothes while you’re waiting in line (always happening here in the City) at the grocery store, riding the bus, walking down the street…
The garments I see on these “spies” are off-the-rack knits, shirts, tees. Anything that has a set-in sleeve is fair game to study – not only how it looks and is shaped, but how it performs.
But back to my new cap: the very first thing I realized when I went to pick up my stitches around the armhole, is that it in itself needs a little handholding. This armhole is slightly too large and if I pick up stitches as instructed by the tomes I’ve studied, my sleeve is going to be tooooo big. Since one of my biggest peeves in design are sleeves that are too big for the room, this won’t do!
And, since this is knit from the top down, starting with a provisional cast-on at the shoulder line, there really isn’t an option to adjust the length. So, the only solution I could come up with was to split the difference in the frequency of the pick-up ratio. Live & learn; fudge and forge ahead. Carry on! ;)
I did follow the normal static areas of top of shoulder and underarm bind-off area as best as I could (as close to a 1-to-1 pick up) so that would be non-puckery.
And I think it’s working! It is pretty smooth, not too tight (which was a big concern with that excess in the armhole length) and I’m rather sussed!


Looks great!
That cap really looks terrific! Can’t wait to see the finished design.
I would love a better instruction on how to make that beautiful sleeve/cap. I can do it in my sewing of clothes but not in my knitting.
that looks amazing! I am still trying to figure out how to make a “regular” sleeve cap… haha! love it.
I’m very interested in your progress and thanks for the link below as well- I will be attempting my first top down set-in sleeve on a jacket soon and am SKERT as well to say the least. It isn’t St st either. Yikes.
Heh! I’m finding it’s really straightforward once you just plunge in there and get your feet wet!
I love to incorporate stitch patterning on the fly — am thinking about teaching a class that would help people “see” the progression a stitch pattern takes so it isn’t so daunting. Everything we do is only a knit or purl stitch; it’s the combo’s that get interesting. Fear not and take it one stitch at a time!
NOW THIS IS EXCITING! Have no fear!